Realistic D-Day Diorama wins Award with a secret ingredient.
- Chris Willetts
- Apr 7, 2022
- 4 min read
This piece is of my Grandad Stanley Coleman, from the 7th Green Howards senior infantry brigade of the 50th Northumbrian Division, landing on Gold Beach in Operation Overlord. His invasion of Normandy in Western Europe started at 8:15 am h+20. Arrived as the second wave on June 6, 1944.

They landed roughly 750m west of their target of La Riviere, due to a navigation error. As points of reference had since been blown up. They did land with 3 Churchill crocodiles from No.13 troop, this will be a future diorama.
This was inspired by my family history research project that I conduct with my Nana, calling from the United States to England every Monday and Friday. Asking lots of questions mapping our family tree then tracing relatives through ww2. You can read more about Stanley and my other family members who fought in the wars.

Planning the diorama:
First, what are your goals? My goal was to have a historically accurate and visually accurate diorama.
Second, find lots of reference photos from different sources to build from. Beaches, uniforms, markings, etc.
How big do you want this? Is your model space running low?
Find scale model kits you can modify to your desires.
Budget, well I find you keep spending as you keep advancing your skills haha
Since the 7th Green Howards landed on the second wave, and I don't know in which order unfortunately my Grandad was on the landing craft. I still wanted to show that the beach had been trodden by many footsteps and churned up before him. So I was looking for pictures of the footsteps in the sand, how the waves wash up, ocean pictures of Normandy in northern France, and how fine artists paint sea landscapes.
Accurate WW2 British Uniform pictures of the 50th Northumbrian infantry division can be found online. Although you won't get the colors or fine detail due to picture quality so I recommend looking at reenactor images. A great source is to check out pictures for the Green Howards Living History Association Facebook group.
Getting the World War ii insignis right is critical in making this pertinent to my Grandad. There are mah methods of searching, for military records in the national archive.
How I made this diorama
The British Normandy figure
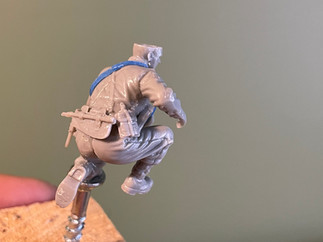
The figure was a 1:35 scale model from Dragon British infantry Normandy '44. I then assembled the figure in the position of running up the beach. The packs in this kit had to be fitted by filing and carving at them so that they take took the contour of the body and not unnaturally stick out.
For the final touch, I DIY-made 1:35 rifle slings from thin strips of Blue masking tape. The masking tape brings texture to the sling and is easy to paint.
Figures were painted using the Vallejo British armour & infantry paint set. A great kit has all the paints except black and skin tones. I followed a tutorial by my trusted resource Youtube Night shift.

The last touch was adding the insignias. I used the archer decal set, very easy to apply following this tutorial from Scale War Machines.
Beach figure base
The Dday diorama base was made from a 3"x3" piece of wood that I found spare in my garage. After some testing, I cut an angle into the top of it to give the beach a slight gradient.
Top Tip: I cut two bases so that I could test techniques before applying them to the final base.
Wood base was then primed with any cheap acrylic paint. A second coat is applied closer to the beach/sand color. The first coat of sand was applied on one half of the base coated in PVC glue with fine coarse sand sprinkled on top. Then sprayed with a 50% water 50% PVC glue mixture. Once dry spots of glue were applied in gobs to replicate sand build-up from heavy traffic.
Referencing my sea pictures there is a gradient of dark blue to blue-green bleeding into the wet sand, a green-brown. I used AK Ocean grey and Green Khaki applied by brush. Then airbrushed to create a smoother gradation in color.
The secret ingredient to creating realistic waves
The secret ingredient is...... a cheap alternative to resins or other modeling mediums is found at lowes, Clear Paintable Solvent Caulk by Lexel. I got the small tube and only used a tiny bit, it does smell so use it in a well-ventilated area. After some testing, I found that it drys in around 10min butt still can be manipulated. However, it stays tacky for a few days, keep it out of dusty areas.

Layers are applied with a lollipop stick letting each layer dry. The figure was placed on top of the first layer with the second layer molded around it. The last 3rd layer was shaped into the wave peaks and up the legs of the figure.

My grandad complained that "he was a short man and got soaked when he landed" I added a drop on the sling.
White Vallejo acrylic paint was dry brushed onto the wave peaks, water's edge, and sea froth. Looking back I would apply paint to each other layers to create more depth.
Model completion and conclusion
For my first beach figure diorama, I am very happy with the results. In my opinion, it's a great tribute to my Grandfather from the 7th Green Howards prince of Wales. Not only did I enjoy, researching the history and testing techniques but every time I look at it I think of him on that fateful day. Could you imagine what they went through! He had already fought in Africa and Sicily fighting in the British Army.
The cherry on top was being awarded Silver in the combined military scale model category. Had some great conversations with other modelers, learning techniques that they used and discovering their ww2 heritage. I hoped to inspire others to tace their relatives through ww2, to remember them.
Follow the facebook group to keep up to date with discoveries and models.


Comments